
Imagine loading all the listings under a category on your e-com platform on a single page. That feels like flooding the page, causing great inconvenience to your users. Also, the page will take more time to load, adding to your reader’s frustration. You need to organize content on your app to make it easy for your audience to access information. Pagination is one of the widely used ways to organize content for better usability and performance. In this article, we will discuss how to implement Pagination when building your app on Microsoft Power Apps.
Need for content organization
User experience is the X-factor for driving user adoption. Your app should be fluid, reducing cognitive load on your users. Let’s go back to the e-com example. You scroll through a thousand products on a single page to find the one you need. Could you locate it easily when you revisit the same page? Not unless you mark it as a favorite or added to cart. This would be a great inconvenience, wouldn’t it? If the listings are organized in different pages, you can locate it by the page number easily.
Well-organized content makes your app usable; usability improves user engagement and retention rate. Proper content organization reduces cognitive load on your users and improves their experience. This is where Pagination comes as an effective way to organize your content.
What is Pagination?
Pagination is a pattern that structures data into pages with numbering. Pagination reduces page load time and delivers a consistent user experience. Your users can easily navigate through your app or content. They can jump directly to the page they are looking for rather than scrolling through the entire content. Such a breezy experience helps you keep them engaged.
With Pagination, your app fetches only the required information at once. Thus, Pagination helps you save resources and network bandwidth, significantly improving the application performance.
Implementing Pagination in Power Apps
If you are building your application on Microsoft Power Apps, you can implement Pagination on your application with these simple steps.
Step 1: Open Power Apps Studio
- To open Power Apps Studio from the Power Apps portal, go to https://powerapps.microsoft.com/ and sign in with your Microsoft account.
Step 2: Create a new Canvas App or edit an existing Canvas App
- If you are creating a new Canvas app, click on the Create button and select Canvas app. Then, give your app a name and select a layout.
- If you are editing an existing Canvas app, open the app in Power Apps Studio.
Step 3: Add a new screen to your Canvas App
- To add a new screen to your Canvas app, click on the “+” button in the left-hand menu and select Screen.
Step 4: Use the following formula in the “OnVisible” property of the screen control:
- Select the screen control for which you want to set the context variable.
- In the right-hand properties pane, locate the “OnVisible” property.
- Enter the following formula: UpdateContext({varPageNumber:1});

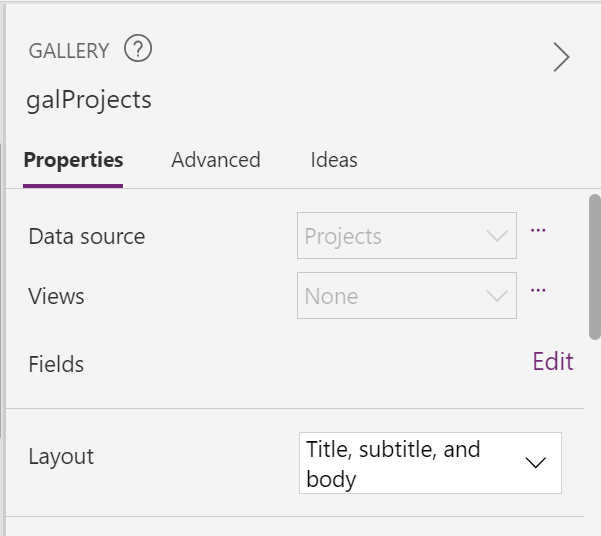
Step 5: Add Gallery Control
- Add a Gallery control to the screen.
- Set the gallery’s items property to a data source.
- In our scenario, we have used the table called “Projects” as our data source.
- Rename the gallery as “galProjects”.
Step 6: Add Dropdown Control
- The dropdown control serves as a user interface element that allows users to choose the number of rows, they want to display in the gallery control simultaneously.
- Add the dropdown control and rename it as “drpPageSize”. You can move and resize it as per your design requirements.
- Go to the “items” property. Define the number of rows you want to display, and the Gallery control will display the records accordingly. For example, [“5″,”10″,”15″,”20″,”25”].

- Navigate to the “onChange” property and add the below mention code –
UpdateContext({varPageNumber:1});

Step 7: Add (Previous) Icon/Button Control
- Add a button or icon and rename it as “Previous_Icon”.
- Use the given formula below in the “OnSelect” property of the previous icon. This will be used to decrease the current page number.
UpdateContext({varPageNumber: varPageNumber – 1})

- Use the given formula below in the “displayMode” property on the previous icon. This will be used to disable the icon if the current page number is 1.
If(varPageNumber = 1, DisplayMode.Disabled, DisplayMode.Edit)

Step 8: Add (Next) Icon/Button Control
- Add a button or icon and rename it as “Next_Icon”.
- Use the given formula below in the “OnSelect” property of the next icon to increment the current page number.
UpdateContext({varPageNumber: varPageNumber + 1})

- Use the given formula below in the “displayMode” property on the previous icon. This will be used to disable the icon if the current page is the last page.
If(drpPageSize.Selected.Value * varPageNumber < CountRows(Projects), DisplayMode.Edit, DisplayMode.Disabled)

Step 9: Add a Label Control
- Utilize the label control to showcase the current page number and total number of records/rows.
- Add a new label control and rename it as “Sequence_Label” and use the below given formula in the “Text” Property of the label.
“Page : ” & If(RoundUp(CountRows(Projects)/ drpPageSize.Selected.Value,0)=0,0,varPageNumber) & ” of ” & RoundUp(CountRows(Projects) / drpPageSize.Selected.Value,0)

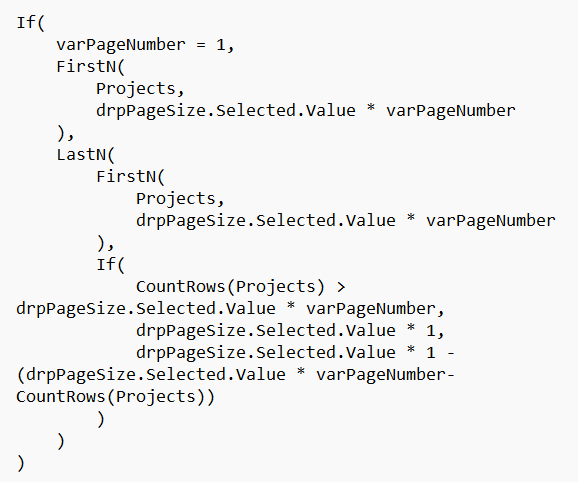
Step 10: Filtering the Gallery Control
- Filter the gallery component to display rows/records based on the pagination logic.
- Use the below given formula in the “items” property of the gallery component.

Step 11: Save and publish the app to verify the changes
- Save & publish the canvas app.
- Play the app and check the new pagination system.
These simple steps will help you add Pagination to your application.
As a company, we are convinced that applications designed with a specific purpose can have a more significant and meaningful impact, surpassing the benefits of merely prioritizing the latest functionalities. Our approach involves meticulous crafting of applications on Power Platform, taking into account factors such as needs, adoption, return on investment (ROI), and user intuitiveness.
Saxon’s Power Platform experts are delivering meaningful outcomes in driving organization’s digital transformation journey. We help our customers build the most reliable and efficient solutions on Power Apps, improving their processes and productivity. From consulting to app development, we’ve got you covered. Get in touch with us now.
Comments
Post a Comment